Exploring Marble Rye Bread
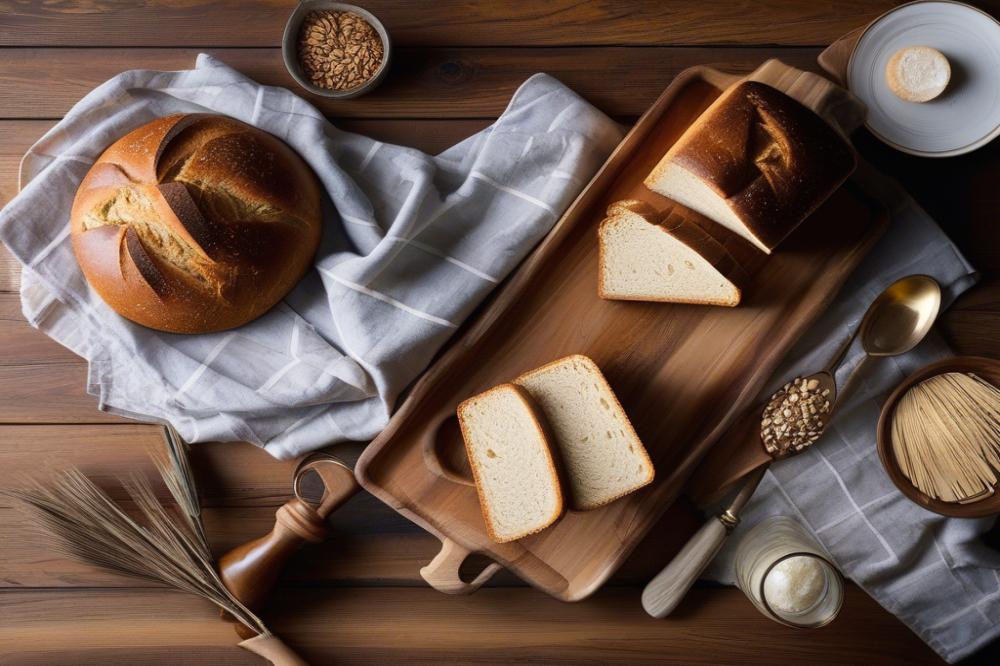
Marble Rye Bread stands out as a delightful blend of flavors and a visual treat in the world of baking. This bread has roots in Jewish culinary traditions, where it became a staple for many households. Its striking swirl pattern, created from a mix of light and dark dough, is not just appealing; it showcases a combination of flavors that tantalize the taste buds.
This delicious bread marries the hearty, nutty taste of rye flour with the subtle sweetness of traditional white or light dough. Such an intriguing contrast makes it popular among bread enthusiasts and home bakers alike. People enjoy the unique experience of taking a bite filled with both dense and light textures. The amazing artistry in marble bread lies in its appearance, as well as its flavor. The visual element adds to its classic bread status, drawing in those who appreciate the look of artisan bread just as much as its taste.
Incorporating techniques from artisan baking, creating homemade bread like this itself can be rewarding. Many bakers consider it an art form. Making marble rye often involves using traditional yeast bread methods while incorporating the playful twist of blending the two doughs. This adds a layer of complexity, making it essential to master various bread techniques. It truly represents how classic recipes can evolve while remaining rooted in history.
Whether served as a base for sandwiches or enjoyed on its own, Marble Rye Bread offers countless possibilities in the kitchen. Its rich heritage and dynamic flavor make it a delightful choice for anyone looking to explore the world of baking. If you’re interested in trying your hand at this delicious treat, the following Rye Bread Recipe will guide you through the process.
Understanding Marble Rye Bread

Marble rye bread is a delicious combination of dark rye and lighter bread flour. This unique blend creates a visual appeal with its distinct swirl pattern. The flavors in this loaf come from the rye flour, which is essential in the tradition of Jewish rye. Not only does it add a rich taste, but it also contributes to the bread’s texture and structure.
Rye flour, compared to wheat flour, offers a denser crumb. It contains proteins that provide a hearty and slightly tangy flavor. In addition, this flour holds more moisture, which can enhance the freshness of homemade bread. Bakers value rye for its ability to create a bread that is both chewy and satisfying, making it perfect for sandwiches or to enjoy on its own.
Traditional methods of baking marble bread involve careful mixing of the two types of dough. Artisans often hand-mix the pastes to control the marble effect. This process allows the flavors to meld without losing the distinct characteristics of each dough. Yeast bread recipes typically call for longer fermentation times, developing deep flavors while creating a light texture, even with the heavier rye flour.
Many bakers still use artisan techniques to produce this bread, focusing on quality ingredients and time-tested practices. Several recipes call for a sourdough starter, which adds complexity to the taste. The sour notes balance the sweetness of the bread flour, resulting in a well-rounded flavor profile.
Crafting marble rye requires patience and skill. When shaping the dough, the swirling pattern not only showcases the two distinct types of flour but also enhances the overall aesthetic appeal. This attention to detail elevates marble rye from everyday baking to a form of art. Traditional recipes may take time, but the results are often rewarded with a loaf that tells a story of cultural heritage, culinary technique, and homemade goodness.
Ingredients and Quantities

To create classic marble rye bread, you will need a selection of ingredients. The following is a detailed list:
- 2 cups rye flour
- 2 cups bread flour
- 1 packet (2 1/4 teaspoons) active dry yeast
- 1 1/2 cups warm water (about 110°F)
- 2 tablespoons sugar
- 1 tablespoon salt
- 2 tablespoons caraway seeds (optional, but add a traditional flavor)
- Cocoa powder (for dark color) – use as needed
Each of these ingredients plays a crucial role in the baking process, leading to a delicious result. Rye flour contributes a distinct taste that is often favored in artisan bread. Bread flour brings in the necessary gluten structure, giving the bread a chewy texture. Yeast is essential for leavening the dough, making it rise adequately.
Nutritional Information
It’s important to understand the nutritional value of your ingredients. The approximate nutritional breakdown for the entire batch of bread is as follows:
- Calories: 1760
- Protein: 52 grams
- Carbohydrates: 362 grams
- Fats: 8 grams
- Fiber: 24 grams
Rye flour is known for its fiber content, making it a healthier choice. Sugar provides energy, while the salt enhances flavor. The optional caraway seeds can also add a touch of health benefits. When incorporating cocoa powder for the darker half of the marble bread, keep in mind that it adds minimal calories but can enhance taste.
By using these ingredients, you are following the traditional recipes seen in Jewish rye breads. Mastering these baking techniques will yield a beautiful swirl pattern that is both appealing and appetizing.
Creating homemade bread is a rewarding experience. It allows you to control what goes into your food, ensuring an authentic taste and quality. Whether served alongside a meal or enjoyed on its own, this version of marble bread is sure to impress.
Method: How to Make Classic Marble Rye Bread

Start by preparing the dough. Mix warm water with yeast and sugar in a bowl. This combination helps the yeast activate, allowing it to flourish. Wait for about five to ten minutes until the mixture becomes frothy. This indicates that the yeast is ready.
Next, gather your dry ingredients. Combine rye flour, bread flour, salt, and optional caraway seeds in a separate bowl. Caraway adds a traditional taste, but you can skip it if you prefer. Stir the ingredients well to ensure they are mixed evenly.
Now, pour the activated yeast mixture into the bowl with the dry ingredients. Use a spoon or spatula to combine the mixture slowly. Once it forms a rough dough, it’s time to get your hands in there.
Knead the dough on a lightly floured surface. The goal is to develop a smooth texture. This process takes about 10 minutes. It’s a great workout that transforms your mixture into a cohesive batch.
After kneading, divide the dough into two equal portions. Incorporate cocoa powder into one half to create that distinct color. This step is where the “marble” effect really begins.
Shape both pieces of dough into rectangles. Keep them flat but not too thin. Then, place one rectangle over the other. Roll them up together to create the swirl pattern. This technique gives you the beautiful marble look in your artisan bread.
Let the dough rise in a warm area. Cover it with a clean cloth. This waiting period can take about an hour or until it doubles in size. Baking requires patience, so take this time to prepare your baking area.
Preheat your oven. Aim for a temperature of around 375°F (190°C). As the oven heats, shape the dough again if necessary. Once ready, place your loaf inside and bake it for 30-35 minutes. Look for a golden-brown crust to know it is done.
After baking, allow the bread to cool on a wire rack. This helps with slicing. Wait at least 30 minutes before cutting into your homemade bread. Enjoy the delightful blend of flavors in each slice!
Tips for Perfect Marble Rye Bread

Baking the perfect marble rye bread at home can be rewarding. Attention to detail can elevate your results. Proper kneading and rising times are crucial. Kneading activates gluten in the dough, which gives it structure. Allowing the dough to rise adequately enhances its texture and flavor. Aim for a doubling in size during proofing for best results.
The swirl pattern is a hallmark of this type of loaf. To achieve that beautiful design, start by rolling the individual doughs together tightly. A roll that is too loose will not hold the pattern. After shaping, place it seam-side down in the pan. This simple technique maintains the integrity of the swirl during baking.
Temperature plays a vital role, especially when activating yeast. Warm water, around 110°F, is ideal for dissolving. If the water is too hot, it can kill the yeast. For the best artisan bread, use a thermometer for accuracy. Once activated, watch the yeast closely; bubbling indicates it’s ready to work its magic.
Storage tips are essential for keeping your homemade bread fresh. Once baked, allow the bread to cool completely on a wire rack to prevent sogginess. Use a bread box or a cloth bag to maintain moisture. Avoid plastic bags, as they can create a humid environment that leads to mold.
Remember, using quality ingredients also makes a difference. Rye flour imparts a hearty flavor that distinguishes this loaf. Fresh ingredients lead to fresher bread. Experiment with different combinations to find the perfect balance for your taste buds.
Wrapping Up the Marble Rye Experience
Baking at home can be a wonderfully satisfying adventure. Crafting your own marble bread fills your kitchen with warmth and delightful aromas. This classic bread combines light and dark flavors, creating a visual and taste sensation. Every slice reveals a beautiful swirl, bringing both joy and comfort to your meals.
Trying your hand at this recipe not only teaches culinary skills but also connects you to the rich traditions of baking. The process can be both calming and creative. Kneading the dough, watching it rise, and then shaping it into a loaf can transform a simple afternoon into a cherished activity.
Feel free to explore variations as well. Think about adding seeds, spices, or different flours. Incorporating herbs could provide an exciting twist for your palate. Each time you bake, there’s a chance to try something new. Invite your friends or family to join in the fun. Sharing this experience creates memories while also showcasing your efforts.
In the end, remember this journey is about more than just making bread. It’s an opportunity for discovery, enjoyment, and perhaps even a bit of relaxation. Don’t hesitate to take on this culinary challenge. The rewards are surely worth the effort, leaving you and your loved ones craving more.

